I am happy to say your votes have helped me reach the fourth round of Project Food Blog. I am so grateful and hope you enjoy this entry. I would love your continued support of voting for me this week. Thank you!
I can still remember my great-grandfather saying those words to me as we went fishing at a small pond my grandparents owned when I was a little girl. Over the warm Florida summers, I would often stay at their farm to help with the housework and any gardening I was able to handle. When I had some free time, I would take my great-grandfather down to the pond to go fishing. The pond was semi-surrounded by old brush and trees, with a giant rock near the middle where my cousins and I would hop out of the canoe to rest on, to just enjoy being outside. The pond was full of bass which my grandfather fed, so at certain times of the day the fish would gather at one spot to feast on millet.
My great-grandfather wasn't able to finesse a worm onto a hook anymore, so I would grab a big earthworm and slide it onto the fish hook for him before adding one to my own line. He apparently wasn't used to girls doing the dirty work, and I still laugh at his surprise. He was proud of me though, especially when we were able to catch a fish and bring it back to show off our success.
Fish was always something my family enjoyed - not only catching, but preparing and eating as well. Our family reunions often involved a fish fry, with an assembly line of family members cleaning, cutting, and cooking fish. The two main types we enjoyed were bass and catfish since those are the two breeds my family stocked in their ponds.
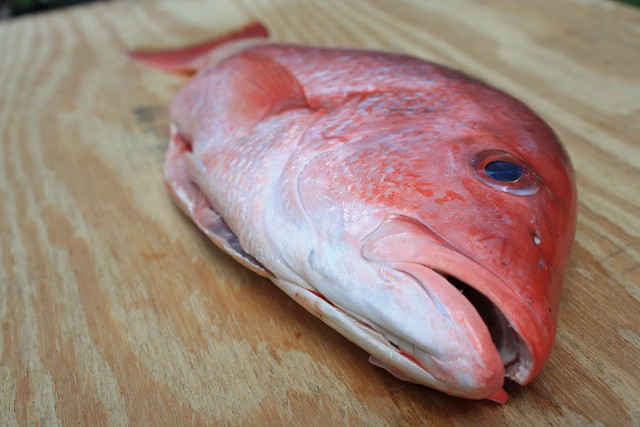
Living in the Florida Panhandle, however, has introduced me to new types of fish though, like Red Snapper. It's a prized fish of the Gulf, with a delicate flavor and firm flesh that can be used in a variety of recipes. It's also common to find it fresh off the boats nearly every day at a local fish market, which is where I pick up mine.
When selecting fresh, whole fish, it's important to find one that has clear eyes and a firm body. These are good signs of a healthy fish straight from the water. The red snapper I picked up was gutted on the boat, but otherwise cleaning and filleting it was up to me - which is how I like it. It's so nice to be outdoors, preparing my dinner from scratch. I love getting to watch my dog play around outside and seeing her intrigued by what I'm doing. Not often am I able to slow down and appreciate the little things, and this process takes me back to my childhood and simpler times. It's a skill I'm proud to know.
Smoking fish on cedar planks goes back at least hundreds of years, which is what many Native American tribes in the Northwestern United States are known for. The smoking process infuses a natural and richer flavor into the fish. Although salmon is best known for smoking, cooking over a fire with a cedar plank can be used for both meats and vegetables. I decided this would be a fun way to cook my red snapper, and give me another excuse to use my little grill before it gets too cold.
It's usually easier for me to visit a local hardware store and have a piece of cedar cut. I have found it's cheaper and the pieces can be cut specifically for the size of your grill. My plank is 12 inches by 7 inches, just big enough for one fish fillet. Always remember to ask for untreated wood that has no chemicals added or sprayed on at all no matter your source. It's possible to reuse the wood as long as it's not too charred or cracked, too.
Allow the wood to soak for at least four hours, although soaking the night before is best. I start with hot water to make sure the wood expands to soak up as much liquid as possible. Just place something heavy on top to keep the wood submerged.
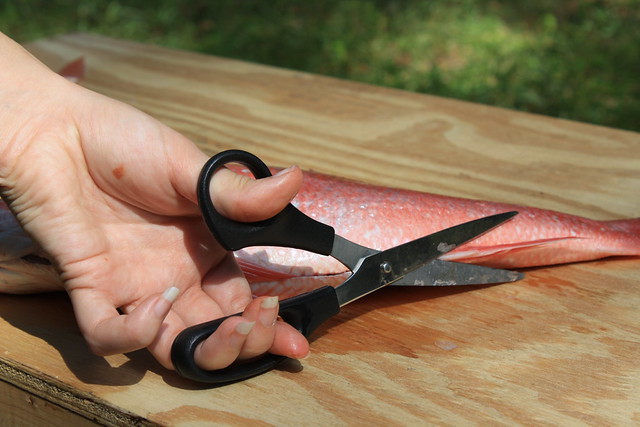
To fillet the fish, I'm used to working outside. The clean up is easier and all the little fish scales that go flying are acceptable outdoors. The photos below are not bloody since the innards were already removed, but in general, filleting a few fish isn't very gory. The tools that you need to fillet are a pair of scissors, pliers, and a sharp, flexible knife.
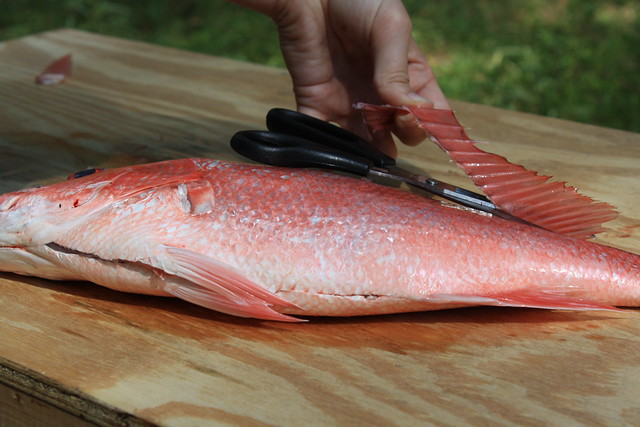
When you're ready to start, begin by removing all the fins.
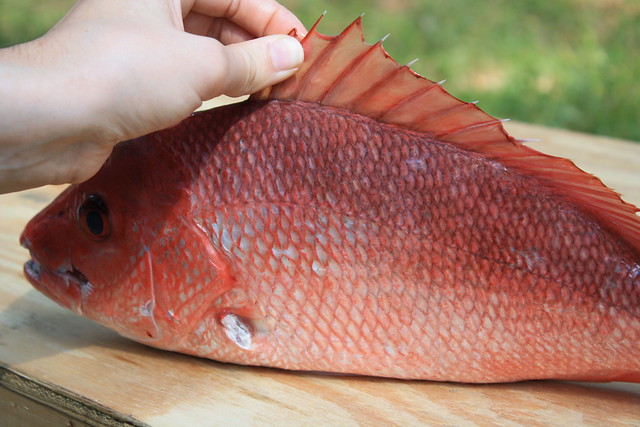
Red snappers have sharp spikes that need to be removed to make sure you don't get poked.
Go carefully and just snip them off, and do not rub your hand where the fins were since it's still sharp. You're just trying to get the fins out of the way, not make the area smooth.
Make sure you get all the fins on both sides.
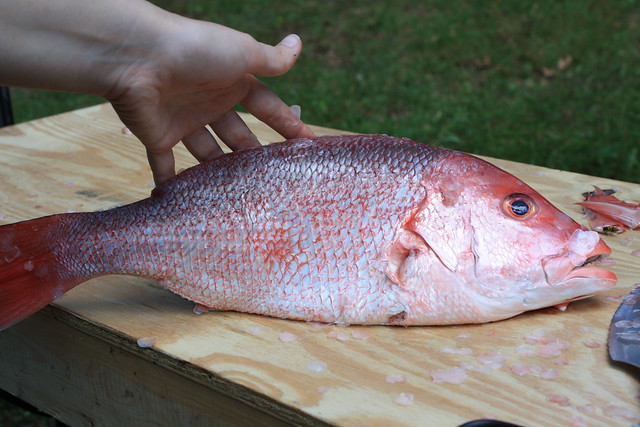
Next, use the back of your knife to descale the fish on both sides. Just rub the back of your knife quickly towards the fish head. This is the opposite direction of the scales and it will pop them off.
Use your hand to feel the skin and make sure they're all gone. Go ahead and lift the fish up a little or turn it if needed to get all the scales by its belly and dorsal fin...er, where the dorsal fin used to be.
At this point I like to hose down my workbench to make sure none of those little scales stick to the fish fillets since they are hard to see.
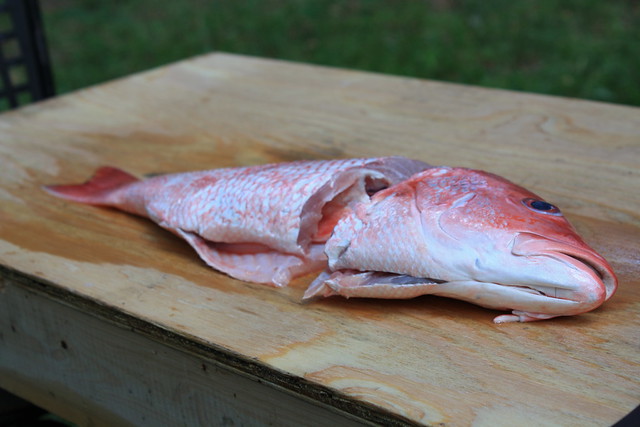
Next, use your knife to make a clean cut through the fish just behind where you removed the pectoral fins. Then make a firm cut through the spine to completely remove the head.
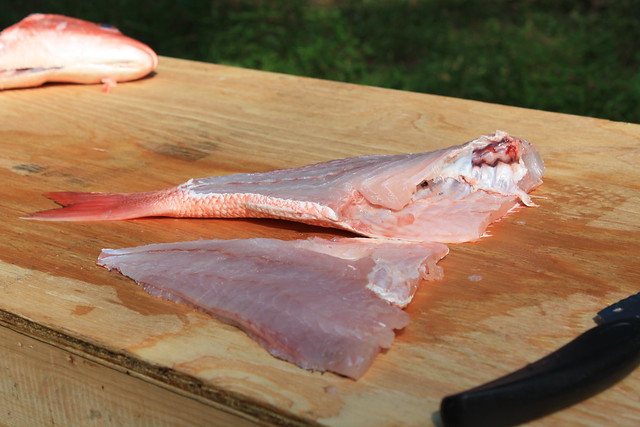
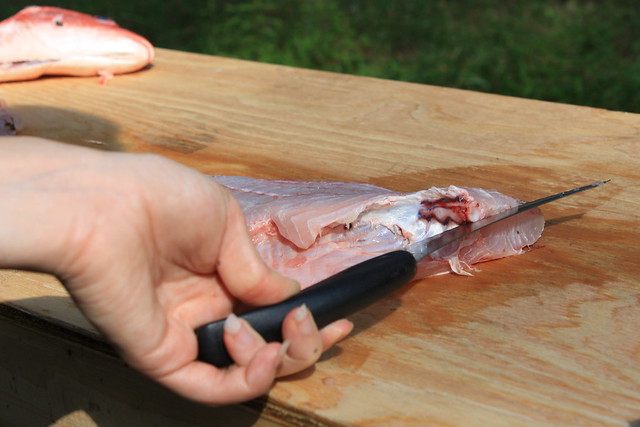
Now it's time to cut your first fillet. Take your knife and cut from the front to the fin, right at the spine. The first few strokes will be the toughest since you'll be cutting through the ribs.
Keep the blade at the spine and try to slice with as little sawing motion as possible to not rip the fillet.
Congrats! You've made your first fillet.
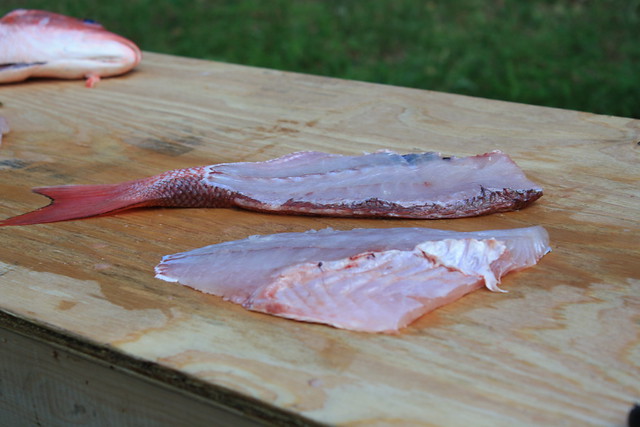
Next, leave the fish as is to make the second fillet.
For this cut, also remain at the spine and try to keep the blade pointed up to remain at the spine.
Great job! Your second fillet.
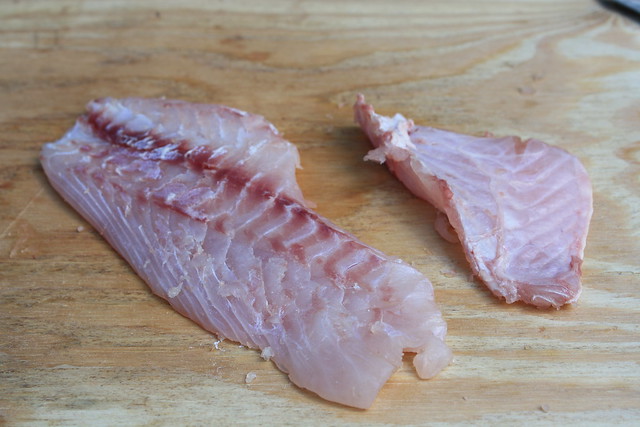
The fillets have some ribs which need to be removed. This is important to feel around and make sure you get them all. You can either use pliers to remove the pin bones, or...
You can slice off the piece with the ribs and use it to make fish stock along with the head and spine.
The skin of the red snapper is edible, but you're welcome to remove it if preferable. Just keep the fillet flat with the skin on the board. Take a sharp knife and slide it along the very bottom to remove the skin. Some pieces may remain which can be cut off.
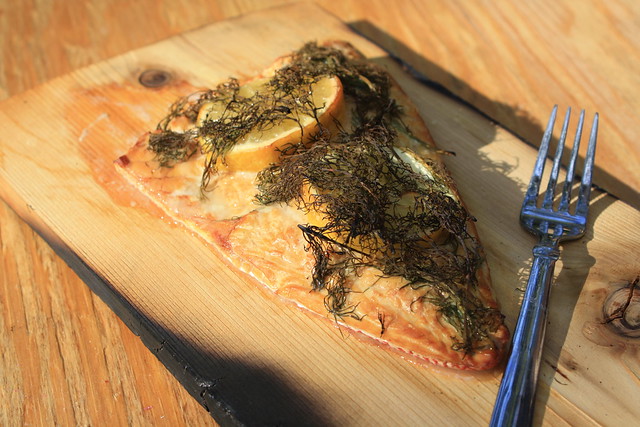
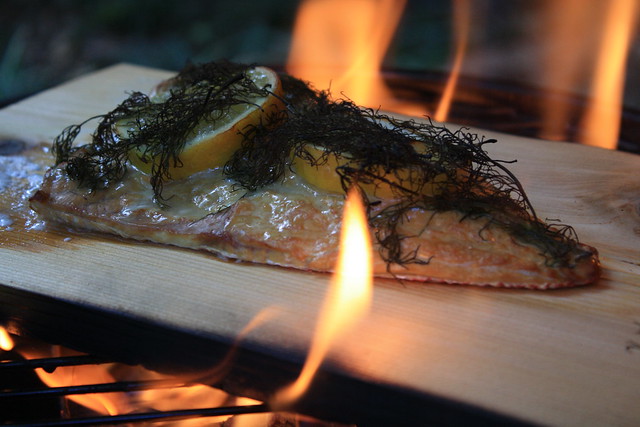
Now we're ready to cook your fresh fillets of red snapper. Remove the cedar plank that has been soaking in water and lay the fillet skin side down. I like to top mine with lemon slices and dill, but you're welcome to use any seasoning you like.
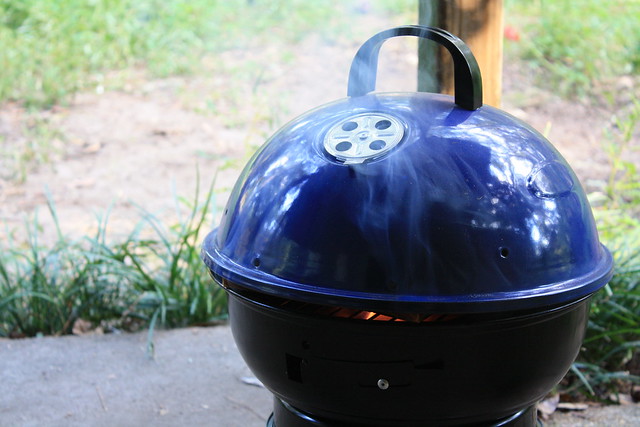
Preheat the grill to medium heat, which should be between 325 - 350*F. Place the plank on the grill and allow it to cook for approximately 15 min, with the cover on. The closer it gets to being done, the more smoke you'll see since the board has lost most of its moisture. Make sure you have a spray bottle full of water next to the grill so you can spray the board if it catches fire.
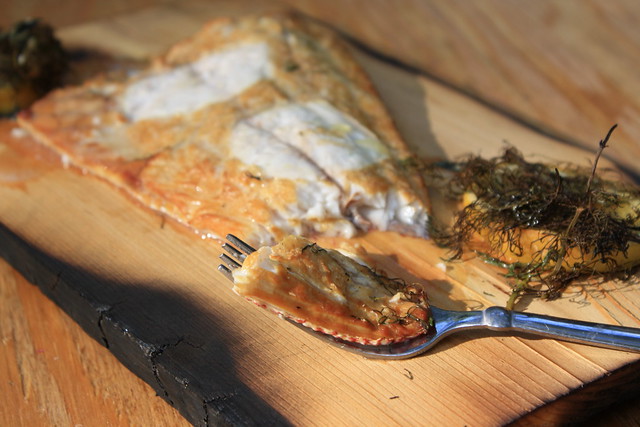
The fillet is ready to eat!
The best part about cooking with cedar planks is you can eat right off the board. Plus, the fish hasn't flaked into the fire or become stuck to the grill. All you have to focus on now is enjoying your work. My favorite pieces are the spots where the lemons sit and drip their juice into the fish. The flaky fish is a perfect balance of smoke, lemon, and dill. It's simple work, but quite pleasurable eating.
When selecting fresh, whole fish, it's important to find one that has clear eyes and a firm body. These are good signs of a healthy fish straight from the water. The red snapper I picked up was gutted on the boat, but otherwise cleaning and filleting it was up to me - which is how I like it. It's so nice to be outdoors, preparing my dinner from scratch. I love getting to watch my dog play around outside and seeing her intrigued by what I'm doing. Not often am I able to slow down and appreciate the little things, and this process takes me back to my childhood and simpler times. It's a skill I'm proud to know.
Smoking fish on cedar planks goes back at least hundreds of years, which is what many Native American tribes in the Northwestern United States are known for. The smoking process infuses a natural and richer flavor into the fish. Although salmon is best known for smoking, cooking over a fire with a cedar plank can be used for both meats and vegetables. I decided this would be a fun way to cook my red snapper, and give me another excuse to use my little grill before it gets too cold.
It's usually easier for me to visit a local hardware store and have a piece of cedar cut. I have found it's cheaper and the pieces can be cut specifically for the size of your grill. My plank is 12 inches by 7 inches, just big enough for one fish fillet. Always remember to ask for untreated wood that has no chemicals added or sprayed on at all no matter your source. It's possible to reuse the wood as long as it's not too charred or cracked, too.
Allow the wood to soak for at least four hours, although soaking the night before is best. I start with hot water to make sure the wood expands to soak up as much liquid as possible. Just place something heavy on top to keep the wood submerged.
To fillet the fish, I'm used to working outside. The clean up is easier and all the little fish scales that go flying are acceptable outdoors. The photos below are not bloody since the innards were already removed, but in general, filleting a few fish isn't very gory. The tools that you need to fillet are a pair of scissors, pliers, and a sharp, flexible knife.
When you're ready to start, begin by removing all the fins.
Red snappers have sharp spikes that need to be removed to make sure you don't get poked.
Go carefully and just snip them off, and do not rub your hand where the fins were since it's still sharp. You're just trying to get the fins out of the way, not make the area smooth.
Make sure you get all the fins on both sides.
Next, use the back of your knife to descale the fish on both sides. Just rub the back of your knife quickly towards the fish head. This is the opposite direction of the scales and it will pop them off.
Use your hand to feel the skin and make sure they're all gone. Go ahead and lift the fish up a little or turn it if needed to get all the scales by its belly and dorsal fin...er, where the dorsal fin used to be.
At this point I like to hose down my workbench to make sure none of those little scales stick to the fish fillets since they are hard to see.
Next, use your knife to make a clean cut through the fish just behind where you removed the pectoral fins. Then make a firm cut through the spine to completely remove the head.
Now it's time to cut your first fillet. Take your knife and cut from the front to the fin, right at the spine. The first few strokes will be the toughest since you'll be cutting through the ribs.
Keep the blade at the spine and try to slice with as little sawing motion as possible to not rip the fillet.
Congrats! You've made your first fillet.
Next, leave the fish as is to make the second fillet.
For this cut, also remain at the spine and try to keep the blade pointed up to remain at the spine.
Great job! Your second fillet.
The fillets have some ribs which need to be removed. This is important to feel around and make sure you get them all. You can either use pliers to remove the pin bones, or...
You can slice off the piece with the ribs and use it to make fish stock along with the head and spine.
 |
| You see those bees in the background...they would not leave me alone! No flowers here - shoo! |
The skin of the red snapper is edible, but you're welcome to remove it if preferable. Just keep the fillet flat with the skin on the board. Take a sharp knife and slide it along the very bottom to remove the skin. Some pieces may remain which can be cut off.
Now we're ready to cook your fresh fillets of red snapper. Remove the cedar plank that has been soaking in water and lay the fillet skin side down. I like to top mine with lemon slices and dill, but you're welcome to use any seasoning you like.
Preheat the grill to medium heat, which should be between 325 - 350*F. Place the plank on the grill and allow it to cook for approximately 15 min, with the cover on. The closer it gets to being done, the more smoke you'll see since the board has lost most of its moisture. Make sure you have a spray bottle full of water next to the grill so you can spray the board if it catches fire.
The fillet is ready to eat!
The best part about cooking with cedar planks is you can eat right off the board. Plus, the fish hasn't flaked into the fire or become stuck to the grill. All you have to focus on now is enjoying your work. My favorite pieces are the spots where the lemons sit and drip their juice into the fish. The flaky fish is a perfect balance of smoke, lemon, and dill. It's simple work, but quite pleasurable eating.









Fabulous post, you have my vote all the way !!! you go girl!!!! good luck and much success to you :)
ReplyDeleteThat's one fresh fish. I can see it in his eyes! GREG
ReplyDeleteGreat job1 I never wanted to do this, but now I can, thanks to your excellent photos and instruction. Best of luck! Cora
ReplyDeleteOh YUm! Congras and good luck
ReplyDeleteExcellent post!! I love snapper. Congratulations and good luck! :)
ReplyDeleteoh wow this looks amazing and wonderful pictures of the steps love red snapper fab post
ReplyDeleteBravo for doing the whole cleaning of the fish, you did like a pro. It looks delicious. Good luck in this round, you totally got my vote.
ReplyDeleteI love the expression on that fishes' face! One picture is worth a thousand words. He also looks delicious
ReplyDeleteWell done for getting this far, and excellently educational post :) I can't get enough seafood, but haven't caught my own for years - I think I should remedy that this summer, and get my hands on a nice plank o' wood.
ReplyDeleteBoy, do I want some of this!!! Looks so flavorful.
ReplyDeleteStunning and Mouth-watering... Bravo!
ReplyDeleteNot that I've ever had the inkling to actually fillet my own fish, I am quite grateful for this tutorial! I might actually try it some time. I've always wanted to go fishing. Your pictures are absolutely amazing and your fish from start to finish looks absolutely amazing! Amazing photo tutorial. You definitely got my vote! I hope you do well in the project =D
ReplyDeleteBrie, what a fantastic post! I love red snapper and actually did this for the first time last year. Oh my goodness, I had scales everywhere! I wish I would have had this post then as it's a perfect tutorial! Best wishes my friend!!
ReplyDeletedelicious preparation and photographs!!! Voted.
ReplyDeleteGreat post, I love this, that fish sure made me want to eat him. Good Luck!
ReplyDelete-Gina-
Great tutorial! Very clear and easy to follow. And you make cleaning your own fish look easy, and not scary at all. Nicely done. (and that flaming shot is fabulous!) I voted for you again!
ReplyDeleteGood luck! hope to see us both in round 5!!! =)
Excellent post! Just gave you a vote.
ReplyDeleteGreat job! I tried to just get the skin off a fillet and managed to stab myself. I'm impressed. :)
ReplyDeleteExcellent post...perfect step by step :)
ReplyDeleteThis looks great and makes me wish I was having red snapper for dinner. Excelent job, you certainly have my vote!
ReplyDeleteFantastic! What a beautiful post- you've got my vote!
ReplyDeleteI'm a big wuss who lets the fishmonger do the cleaning and scaling and filleting, but your post makes it look so easy that I think I've just been shamed into doing it myself next time. :)
ReplyDeleteGreat job with your tutorial - beautiful photos, clear instructions, and wonderful choice of recipe. You've definitely got my vote!
Great tutorial on the snapper Brie. I love the way you cooked it. Simple and flavorful. You have my vote again.
ReplyDeleteLora
Beautiful tutorial! I'm inspired to try filleting my own fish. You've cooked it perfectly, it looks mouthwatering!
ReplyDeleteYou got me with your first line. Yay to girls who hook worms! My vote's in. Good luck!
ReplyDeleteAwesome fillet tutorial! Now I feel like I can try it in my own kitchen (always left it to the fishmonger before). Thanks for stopping by my blog and good luck this round!
ReplyDeleteBeautiful red snapper! This is what step-by-step photo-posts are most useful... how to filet fish!! I've never fileted before, I may have to try it... I'm bookmarking this post!!
ReplyDeleteI'm totally intimidated by whole fish, so I LOVE that you do this. Maybe some day I will tackle (get it?!) my own?? Good luck!! :)
ReplyDeleteSues
Nice filleting skills, a friend of mine just taught me how to properly fillet salmon, so I can totally appreciate your step-by-step photos! Well done!
ReplyDeleteWhat a great tutorial! You've got my vote for sure!
ReplyDeleteThat looks really yummy, I love the taste of lemon with dill on fish, thanks & wish you good luck :)
ReplyDeleteFantastic post, recipe and photos. You've got my vote, more than one if I could :)
ReplyDeleteNeat! Since I live in a little condo I don't have an outdoor workspace to try something like this (ha ha, and of course no ability to grill!), but that looks like a fantastic meal. Yum.
ReplyDeletecongrats and good luck!this is a great tutorial!
ReplyDeletevoted!:))
you took something totally frightening to tackle and made it a breeze, perfect job!
ReplyDeleteWhit
Great tutorial without the grossness factor! Good luck in round 4!
ReplyDeletegreat write up! voted!
ReplyDeleteSmoking a fish on a cedar plank is most definitely a new one on me - love it when I learn something new from a blog post!
ReplyDeleteThis is an excellent tutorial! You make it look so simple! I know I get spoiled having someone else fillet for me, so this is perfect for me!
ReplyDeleteThis looks delicious! At home we eat loads of fish and snapper is our favourite - so sweet-fleshed. This is a great new way for us to cook it. And the filleting tutorial - spot on! Voted!
ReplyDeleteLoved the story about your great grandfather!! You have a vote from me!
ReplyDeleteMy own post is a romp through croissant making that's filled with humor, exhaustion, and a little bit of popstar glamor. Come see if you'd like :)
Excellent post - you got my vote for this! Good luck :) Feel free to hop over to leave a comment :)
ReplyDeleteHave a wonderful day!
jen @ www.passion4food.ca
Kinda loving how you get down and dirty with this beautiful fish. Simple, informative, and clean. This is a great post.
ReplyDeleteGreat job on this step-by-step photo challenge---helpful, and delicious!
ReplyDeleteI live in Northern Ca, and red snapper was always popular here (well, at least with my parents)...
ReplyDeleteYour version looks so enticing, the fish looks amazingly fresh and light.
Great tutorial on a subject that gets overlooked sometimes, most of the time I get lazy and buy filets. Also, your final product looks absolutely scrumptious. Good luck this week, voting for you!
ReplyDeleteLick My Spoon
I love this post. You got my vote!
ReplyDeleteNicely done! We should have done a cedar plank, surf and turf combo! :D
ReplyDeleteFirst time visiting your blog, but I already like it! Fishing with good ol' boys, handling worms, fileting a whole fish - you are an adventurer! Now, all I need is a really sharp knife and I am ready to go! great tutorial and beautiful pictures. Good luck!
ReplyDeleteGreat choice for a fantastic tutorial!
ReplyDeleteGreat step-by-step with fantastic supporting images and narrative. Very nicely done!
ReplyDeleteWe love your photos!!! Excellent demonstration
ReplyDeleteCheers:)
C147B85CD1
ReplyDeleteTakipçi Satın Al
Tinder Promosyon Kodu
Zula Hediye Kodu
RDR2 Ölümsüzlük Hilesi
Tiktok Jeton Hilesi
Google Yorum Satın Al
SEO Danışmanı
Nested Sunucu Satın Al
En İyi Animasyon Filmleri