Wednesday, September 29, 2010

Tart Cherry & Almond Cornbread


I am a huge fan of Foodbuzz as evident by my icons to your right and appreciate all the other very talented food bloggers they have introduced me to for over a year now. This November, they are hosting the 2nd Annual Foodbuzz Festival in San Francisco, CA - which is quite a ways away from the Panhandle of Florida. As a treat to Featured Publishers, Foodbuzz has teamed with Nature's Pride to offer a chance to attend the Festival sans cost. To be considered for this opportunity, bloggers are creating recipes using one of the natural bread products offered by Nature's Pride.


I cannot recall a time I made a recipe using slices of bread other than a sandwich, but I set to work contemplating a unique recipe I could create with slices of bread. After some deliberation, cornbread came to mind and seemed like a fantastic idea. It's a straightforward recipe I am comfortable with and is delicious to devour. Instead of using flour, I decided to replace it with the bread. However, fresh bread would not work. My favorite cornbread recipe includes browned butter, which creates a rich flavor in the bread that is sensual for a simple dish. I settled on not using butter and instead toasting the bread to mimic the rich flavor profile I love.

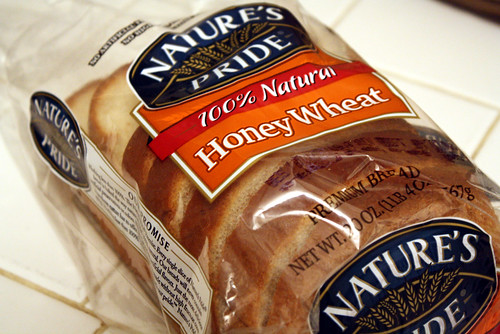
Once I went to the grocery store to find the Nature's Pride bread, I stumbled upon their option of Honey Wheat bread which sounded perfect. Although not as soulful as the organic sprouted spelt flour bread I love from my local co-op, it is one of the best conventional breads I have seen offered, without harmful substances like high fructose corn syrup. I felt the honey would compliment the sweeter cornbread I wanted to prepare and went with this option.

The addition of almonds and tart cherries provides a subtle sweetness to this filling side dish, and transforms it into more than just something to sop up gravy with. I enjoyed it as a breakfast treat and found it goes fantastically with hot coffee. Not to mention a satisfying snack or faux dessert. I brought in half the cornbread to work and received rave reviews. I had never had so many compliments on something I shared with friends, so I know I'm on to something with this recipe.

The toasted bread is a perfect substitute to browned butter and did provide the richness I crave. The almonds and tart cherries gave little bursts of sweetness, but were not overpowering enough to be considered a sugary dessert. It was wonderful to create a cornbread without using cups of flour just to try something different and allow other flavors to shine. I am so happy with my successful cornbread and hope you give this recipe a try this autumn to keep your belly full and your heart warm.

Tart Cherry & Almond Cornbread
Printable Recipe

5 pieces of Nature's Pride Honey Wheat Bread, toasted - yields 2/3 cup breadcrumbs
1 1/2 tbsp almond slices, toasted
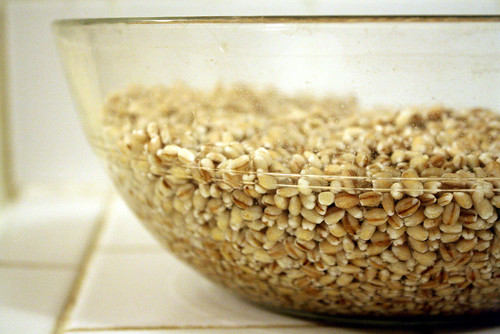
2/3 cup yellow cornmeal
2/3 cup almond meal
1/3 cup turbinado
3 tbsp all-purpose flour
1 tsp baking powder
1/2 tsp baking soda
1/2 tsp kosher salt
2 eggs
3/4 cup buttermilk
1 1/2 tbsp olive oil
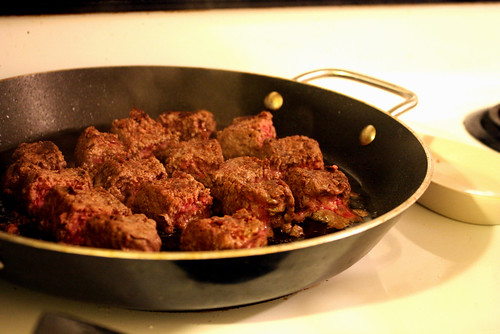
1/2 cup tart cherries
stick of butter


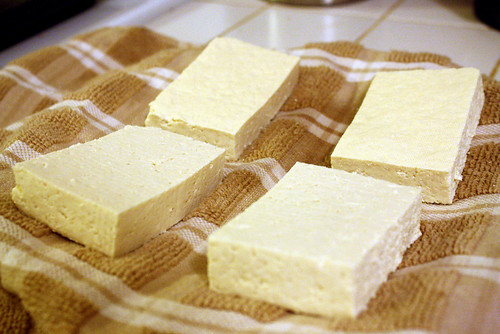
Place an 8" or 10" cast iron skillet in a cold oven and preheat the oven to 400*F (adding the cast iron skillet to the cold oven to gradually warm will prevent it from warping or becoming damaged). Lay the bread pieces on a cookie sheet without butter or cooking spray. Allow the bread to toast 10 min on each side, although watch carefully in case your oven cooks rapidly.


While the bread is toasting, turn a burner on the stove to medium heat. In a small skillet, add the almonds and cook for approximately 5 min until the almonds are toasted, tossing occasionally. Remove from the stove and set aside.


Remove the bread from the oven and carefully add it in pieces to a food processor and pulse until the bread turns into breadcrumbs.


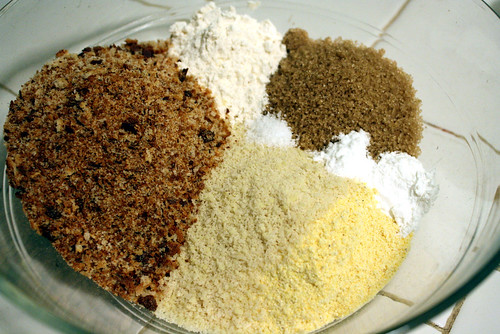
In a large bowl, add all the dry ingredients of breadcrumbs through kosher salt.
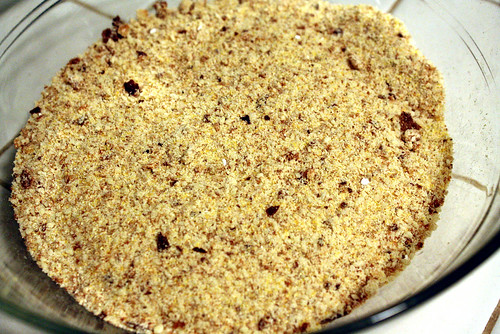

Mix thoroughly.


Next add the wet ingredients of eggs through tart cherries, plus 1 tbsp of the toasted almond slices, and mix well.


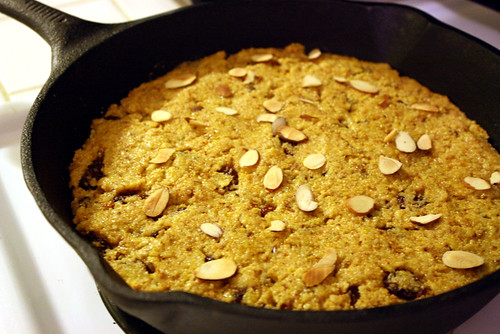
Remove the cast iron skillet from the oven with an oven mitt and thoroughly coat the bottom and sides with a stick of butter so the batter doesn't stick. Pour in the thick batter and spread evenly with a spatula. Lastly, add the remaining toasted almond slices evenly over the top of the batter. Using your oven mitt, return the cast iron skillet to the oven at 400*F and cook for 20 min.


Remove from the oven and allow it to cool for 10 min before slicing. Serve immediately or store for savoring later.

~Yields 8 servings.

~Adapted from Cooking Light.

A sample product of Nature's Pride was made available to me by Foodbuzz with no obligations for review.

Sunday, September 26, 2010

Project Food Blog #2 - Pad Thai

Dear Readers: Thank you for your support as I have made it to Round 2 - The Classics! I appreciate everyone who signed up at Foodbuzz to vote for me. Voting for this round starts Monday, so please visit Foodbuzz to cast your vote!

In the second challenge for Project Food Blog, I’m to make a classic dish from a foreign land. I have to admit I was feeling a bit overwhelmed from all the possibilities, but I had an idea that came to mind pretty early on that I decided would be great to share. I am an adventurous, though not extreme, eater and have made dishes from many cultures, so I wanted to tackle a cuisine I've never cooked before.

When I crave foreign foods when going out, the two cuisines I almost always debate over indulging in are Indian and Thai. I grew up always trying new dishes. I rarely have the same dish twice since so many delicious recipes are just waiting to be tasted. While many dishes or cuisines may technically be foreign in nature, they are not to my palate. Foreign dishes, like Indian Jalfrezi (marinated curry pieces), have become second nature to me; or ingredients of exotic dishes are actually not foreign or unique, just used in different ways.

However, when I enjoy Indian Tikka (marinated chicken pieces) or Thai Gai Pad Med Mamuang (chicken with cashew), it always transports me to another place. The spices and ingredients always make me long for travel and discover how an exotic influence constantly comes out of these dishes, no matter the chef or place I enjoy them.

Indian food is occasionally prepared at my house, so although the dishes still excite me, it’s not something unique to my abilities. However, I cannot recall a time I made a Thai dish. I have always ventured to Thai restaurants for Tom Yum Po Taek (mixed seafood and mushroom soup) or Tom Kha Het (coconut milk and mushroom soup), and of course the classic Pad Thai (stir fried noodles).

The ingredients in a great Pad Thai recipe will have a perfect balance of the five flavors: sweet, salty, sour, bitter, and heat. Many sources list the first four tastes, but spiciness is a finessed staple in Thai dishes.

Many cooks may be familiar with the saying "There’s a pad thai recipe for every cook", and after researching the history of this famous dish and its every changing ingredient list, it is evident why. Pad Thai is one of the national dishes of Thailand, in which the modern version became popular after World War I. Traditionally, Pad Thai was a rice based dish; however, after an economic crisis from the war and a subsequent rice shortage, the government sent out instructions on how to make rice noodles to create jobs and more noodle shops. The efforts were successful and rice noodles have since become a staple in Pad Thai. I was also curious to discover peanuts, almost synonymous with the recipes I'm used to, are not universally used in Thailand for Pad Thai since they have been linked to cancer. After some more research, it appears aflatoxin is possibly causing liver cancer in some villages that use peanuts contaminated by the fungal carcinogen. For the unsure, cashews are often used in the recipe, and since I like cashews more, this is the one I decided to use in my recipe. The westernized version of Pad Thai is commonly greasy and heavy, but in Thailand the dish is drier and lighter - which is the way I like it.

I was thrilled to find nearly all of the ingredients I needed in my local organic co-op. My little town thankfully has a thoroughly stocked Asian market, so I was able to gather the rest of the ingredients I needed. It always makes me happy to discover new finds that are common to other cultures and it keeps me grounded to hear other languages being spoken. It reminds me the world still has secrets it hasn't yet revealed to me. And thanks to my fiancé's adventurous cooking, we have a wok at home. This is the "secret" ingredient, if you will, that gives the Pad Thai its distinctive flavor. A well seasoned, super hot wok will infuse the Pad Thai with an almost smokey quality that will make the finished meal more authentic.


The trick to making a successful Pad Thai is to be prepared. All the ingredients need to be prepped and ready to be thrown into the hot wok, since little time is had between steps.


Also, in case some ingredients are simply not available in your area, substitutes are okay. You can replace fish sauce with soy sauce and palm sugar with brown sugar.


Also, crushing the dried shrimp is optional, but I found it made them more fragrant in the dish. The one item that is important for an authentic taste is the tamarind paste; it's the exotic flavor that really helps bring the Pad Thai together.


I preferred to cook my Pad Thai on the grill outside, a la Alton Brown style, since it creates so much smoke, but cooking inside on the stove with a burner set to high is just fine.

I am very happy with this Pad Thai. It tasted just as good, even better if I may brag, than dishes I've enjoyed at restaurants. The tamarind sauce and smoke from the wok are what really make a difference to have authentic Pad Thai. I really enjoyed savoring each bite to experience the five flavors so important to Thailand's dishes.


Pad Thai
Printable Recipe

6 oz extra firm tofu
1 cup soy sauce

1 oz tamarind paste
3/4 cup boiling water
2 tbsp palm sugar
2 tbsp fish sauce

6 oz Thailand rice sticks

4 tbsp virgin coconut oil, divided
1 shallot, diced
2 garlic cloves, diced
2 eggs
10 shrimp, cleaned with tail removed
1 tbsp dried shrimp, crushed
1 tsp Thai red pepper flakes
1 cup scallions, chopped
1 cup mung beans, rinsed
2 tbsp pickled turnip strips
1/2 cup cashews, roughly chopped
lime wedges for garnish


The night before or several hours before cooking, divide the tofu by slicing it once horizontally and once vertically. Place the four pieces on a tea towel, cover, and weight to drain the excess water. Once the tofu are dry, slice into six strips per piece and marinate 12 pieces in 1 cup soy sauce (you will have tofu left over to use for extra Pad Thai or in another recipe).


To prepare the tamarind sauce, add 1 oz tamarind paste to 3/4 cup boiling water and crush well with a fork. Drain the tamarind paste through a sieve, then add the palm sugar and fish sauce.


Approximately 10 min before cooking, cover the rice noodles in hot water. The noodles should not soak more than 10 min or they will become mushy and fall apart, so drain the water if necessary before cooking begins.


Once you are prepared to cook, place 2 tbsp virgin coconut oil in the hot wok and add the tofu. Either toss carefully or use a wooden spoon to keep the tofu moving around the bottom of the wok so they do not burn. After a few minutes, the tofu should be brown on both sides. Remove from the wok and place back in their bowl.


Next, add the last 2 tbsp virgin coconut oil and add the shallot and garlic, also stirring.


After 1 min, add the noodles and sauce, stirring well.


After 1 min, push the noodles further up the wok and add both eggs. Allow them to lose their translucency, then scramble. Once the eggs are scrambled, push them to the side also and add the shrimp.


Once pink on both sides, add the remaining ingredients of dried shrimp, Thai red pepper flakes, scallions, mung beans, pickled turnip strips, and cashews. (Remember to reserve a few pieces of mung beans, scallions, and cashews as garnish.) After cooking for 2-3 min, remove from the heat to plate and serve immediately. Garnish with lime wedges if desired.

~Yields 2 servings.

~Adapted from Alton Brown.

Saturday, September 25, 2010

Curried Egg Salad Sandwiches


This month's star for the International Incident Party is the egg. Hosted by Jeroxie, with co-hosts Tasty Trix, 5 Star Foodie, and honey and soy (happy birthday!).

This challenge is perfect because I promised to share my "secret" curried egg salad recipe and Trix was quite excited about learning the recipe; so in celebration of her birthday, I'm sharing the recipe for this party.

The ingredient list and instructions are embarrassingly short, but the taste is both simple and impressive.

I learned the secret to a good egg salad from my Aunt Joan - dill pickles. They usually don't make it into my recipes because I can eat a whole jar in record time. If I was to enter any food eating contest, a la Man v. Food, it would be for dill pickles. And if you're making egg salad to go on a sandwich, the secret is to both toast and butter your bread.

I like my egg salad to have texture, so I keep the eggs only roughly chopped. I love to see the ingredients and get the distinct crunch when they are left more intact. The first flavor you experience is the comfort from the toasted, buttered bread. Next, the curry stands out from the spices, but doesn't cover up the freshness of the eggs or vegetables. This curried egg salad is an exotic twist from regular egg salad sandwiches, and makes a delicious side dish as well.


Curried Egg Salad Sandwiches
6 hard boiled eggs, chopped
2 large celery stalks, diced
2 small dill pickles, diced
1/3 cup mayonnaise
1 tbsp curry powder
2 tsp Dijon mustard
1 tsp fresh parsley, roughly chopped
1/2 tsp kosher salt
1/8 tsp cayenne pepper
Toasted, Buttered Bread


Detailed instructions for hard boiling the eggs can be found in my post for Deep Fried Deviled Eggs.


Add all ingredients into a large bowl. Stir together well, being careful not to crush the ingredients.


Serve immediately.

~Yields 4 sandwiches or 6 small sides.

~Original by Brie.


P.S. If you want old fashioned dill pickles, I highly encourage you to find the brand Bubbies. The *best* dill pickles I have ever tasted. And another secret is to save the jar and brine, then add more clean, washed baby cucumbers to make more pickles!


Please visit these other great blogs to see their contributions to the party!

~Le Grand Fromage & Bubbies are in no way affiliated.

Friday, September 24, 2010

North Florida Wine & Food Festival - Evening of Bubbles


I had the priveledge of being selected as the main food photographer for the North Florida Wine & Food Festival in Tallahassee, FL, held at Florida State University's modern University Club Center. This was the second annual celebration held between September 8 - 12 of this year, with days of non-stop champagne, wine, and food!


The first night on September 8th was proclaimed the Evening of Bubbles, which featured over 30 fabulous champagnes and sparkling wines with a variety of delectable appetizers.


Not to mention a selection of sensuous vodka martinis and seasonal beers.


The benefit of the festival is not only to introduce a sophisticated variety of champagnes, wines, and local eateries to attendees, but support and provide FSU's Dedman School of Hospitality students with valuable experience in the industry.


I was excited to cover this event not only to showcase the delicious local variety offered by unique wineries and bistros, but to expand my food comfort zone. I gained valuable photography experience, as well as cataloged a variety of new wines to try and restaurants to visit.


It was wonderful to dress up and experience a night of endless drinks and morsels. Plus they had a fashion show - very chic.


This evening was a wonderful sample of unique drinks and culinary skills, plus a peak at the things to come for the larger events...

Thursday, September 16, 2010

Project Food Blog #1: Bison & Barley Stew

A Note To My Readers: As evident by the Foodbuzz icons to your right, I am competing in the first online "Next Food Blog Star" challenge called Project Food Blog. The competition begins with nearly 2,000 food bloggers and will feature 10 contests, with fewer and fewer Foodbuzz Featured Publisher bloggers advancing per stage. The winner will receive $10,000 and a special feature on Foodbuzz! This is my first post and I will also be publishing a voting post in a few days when you'll be able to vote for me to keep advancing. Voting does require registering as a Foodbuzz member to keep things legitimate, so go ahead and register as a member now so you'll be ready. It's a wonderful community of dedicated foodies and will open up a world of other food bloggers I know you'll enjoy. Voting begins September 20th, and you can view my profile here. Wish me luck!

As a self-trained cook, I have the mindset of helping readers transition from the safety of quick, conventional foods into the unknown realm of natural cooking. I spend much of my time researching and understanding the need and science behind traditional food practices so my readers can easily comprehend why making different choices are healthier.

I believe I can be the next Food Blog Star because I am passionate about Real Food. Ancient Food. Traditional Food. And I want to reach as many people as I can and turn them on to it.

Real Food is environmentally stable, grown in an ethical manner without pesticides or antibiotics using natural practices in local communities, to provide organic, nutritionally dense foods to nourish the body and earth.

I am not afraid to speak my mind about why Real Food is more beneficial and healthier than conventional, manufactured food-like products. I am willing to discuss with anyone why Real Food is important, which is a major reason I chose to begin a food blog and reach more people.

One person I didn't have a chance to reach was my father. He passed away from a heart attack eight years ago this week. If I had known then what I know now about Real Food, I might have been able to help him. I remember him trying weight loss programs, diet foods, and health gimmicks. Now I know why those things never worked and only made his weight worse. I was able to have 19 years with him as a hilarious mentor and intuitive father. Although I could still benefit from his wisdom today, I wish my three younger siblings would have been able to have more time with him like I did. Losing him was a large reason why I started my blog. I try and keep my posts happy and positive while informing my readers of natural, healthy foods, so I tend not to mention sad topics; however, with the anniversary of his death and Project Food Blog starting on nearly the same day, I am taking that as a sign to be more forthcoming in one of the major drives behind my recipe development and blogging. If I am able to teach others about beneficial foods and help others morph their diets into healthier choices, then maybe someone will not have to lose a loved one so early to a preventable disease.

Cherokee Grape Dumplings

To demonstrate ancient foods with traditional practices, I have begun sharing my family's Cherokee recipes. I am not full Cherokee, but I embrace and am proud of this heritage. I am independently learning more about Native American foods and its history so I can share these healthy, sustainable foods with my readers. If native, traditional foods helped sustain and thrive tribes in the Americas, then we can return to these foods and practices to nourish our bodies and communities. This can be seen by the growth in backyard gardens and canning foods that has increased in the past few years. These types of beneficial techniques are not just for difficult financial times, but should be used to continuously nourish one's body and wallet.

As an organic, traditional, Native American food blogger, I believe my dedicated apprenticeship and passion sets me apart from other food bloggers and will make me a successful Project Food Blog Star.

Now it's time for my favorite thing - sharing a recipe with you. This recipe reflects both my traditional food and Native American cuisines: Bison & Barley Stew. I grew up on this dish and always looked forward to it. I've improved it by using bison instead of beef, soaking the hulled (not pearl) barley, and using more root vegetables than starchy ones. Hulled barley is the whole grain version, with only the outer husk removed. It contains high amounts of bran, protein, and fiber compared to pearl barley which has all the outer layers removed taking away most of the nutrients. Hulled barley that has not been soaked will contain anti-nutrients, like phytic acid, and will require a long cooking time; soaking the grain will circumvent both these issues.

This is a wonderful comfort food for cooler weather since it will sustain your energy level and keep your blood sugar stable. I've always loved how bison has such a hearty flavor on its own without needing other ingredients added. The stew is thick and rich in taste from the vegetable broth and roasted, earthy vegetables that nearly melt in your mouth. By roasting them first, they hold up on their own with the barley. Plus, by cooking the barley in vegetable broth, it takes on a delicious, warm character rather than cooking in water alone. I leave the tomatoes for the end so they also remain intact and add a nice acidic bite to the dish. If you like your stew a little soupier, add an extra 2 cups of filtered water towards the end. These simple, healthy ingredients come together and meld into so many beautiful layers on your palate. Its warmth will satisfy both your body and soul.


Bison & Barley Stew
Printable Recipe

2 cups hulled barley
filtered water
4 tbsp whey, separated

1 qt vegetable broth
3 bay leaves
1/2 bunch celery, roughly chopped
1/2 lb crimini mushrooms, quartered
2 large carrots, peeled and roughly chopped
1 medium yellow onion, roughly chopped
1 large turnip root, peeled and roughly chopped
2 large golden yams, peeled and roughly chopped
2 jumbo garlic cloves, roughly chopped
4 tbsp olive oil
1 tbsp paprika
1 tbsp kosher salt
2 tsp black pepper
4 cups filtered water
4 medium tomatoes, hallowed and roughly chopped
2 tsp coriander
2 tsp white pepper

1 tbsp olive oil
1lb bison meat, either cubed steak or ground


Beginning 24 hours before cooking the stew (the night before), add 2 cups hulled barley into a large glass bowl. Cover the barley in several inches of water, add 2 tbsp whey, and stir gently. The barley will absorb much of the water, so ensure an ample amount is available. After 12 hours (in the morning), drain the water and replace it with an equal amount of warm filtered water and another 2 tbsp whey, stirring gently.


When you are ready to cook the stew, rinse the barley thoroughly until the water runs clear before using.


In a large pot (preferably 12 qt), add the barley, vegetable stock, and 3 bay leaves. Allow it to boil gently on medium heat, with gentle and not rapid bubbles. The barley will need to cook for 20 min, stirring occasionally.


Preheat the oven to 350*F. Using a large sheet pan with a lip, place the chopped vegetables of celery through garlic in an even layer. Drizzle the 4 tbsp olive oil over the vegetables, then evenly sprinkle the paprika, kosher salt, and pepper. Roast in the oven for 20 min.


After 20 min, remove the vegetables from the oven and carefully add to the barley. Add 4 cups of filtered water, the chopped tomatoes, coriander, and white pepper, stirring well. The burner will need to be turned to low and allow the stew to simmer while preparing the bison.


In a large skillet over medium-high heat, add the olive oil and allow it to become hot, usually 2-3 min. Then add the cubed bison meat and brown on all sides, usually 7-10 min. Remove from the pan and add to the stew, stirring gently. Remove the bay leaves and serve immediately.

~Yields 8 servings.

~Original by Brie.


Tuesday, September 14, 2010

Raw Milk - How To Make Whey & Cream Cheese


In part three of my raw milk series, I'll show you how to make whey and cream cheese. As with the butter and buttermilk, no other ingredients are needed; we'll just need some cheesecloth or a tea towel and large sieve.

Whey is a food product which seems forgotten in our modern era, and is often sadly considered a 'waste' product left over from making cheeses. Whey is actually a nutritionally rich food that is important in lacto-fermented foods, like kimchi and sauerkraut, as well as needed for soaking grains. A few tablespoons of whey can also be mixed with filtered water to be consumed as a drink to sooth an upset stomach or digestive issue. Centuries ago, the Vikings from the Icelandic area consumed whey as a beverage and also used it to help preserve foods for longer periods of time, much like pickling foods in vinegar. The lactic acid in whey is what slows the growth of harmful bacteria, while the helpful bacteria and minerals contribute to its many uses in foods.

This process will produce a 'sour' whey, which I consider a co-product, not a byproduct, when making cheeses. Thus far in my experiences with whey, I have not used it plain in a drink, but it is helpful for soaking a variety of grains and legumes. The whey will keep for up to six months if kept in a sealed mason jar in the refrigerator. I usually make small batches in specific amounts for a certain dish though.

The cream cheese also rarely lasts long in my house! We both love cream cheese in recipes or plain on breads and fruits. If making some ahead of time to store, the cream cheese can be kept for up to a month sealed in the refrigerator. The homemade cream cheese is naturally sweet and has a unique rustic taste depending on the area the cows live and eat from; I can tell a slight difference in my cream cheeses when my local market runs out of my favorite dairy's raw milk and I use another. These little nuances help me feel connected to my local farms and makes me happy to be so close to the source of a natural food.

This process can be made with raw milk only. Using raw milk that is fresh will also take longer, so I recommend started this process after you've had some in your refrigerator for a few days. It is also faster in the summer, since the helpful bacteria react swifter in warmer weather. I place my raw milk on a shelf in my laundry room since it's always the warmest room in the house (mainly from it being the only room that receives natural sunlight from the rest of the house being shaded by old Florida oak trees).

How To Make Whey & Cream Cheese
Printable Recipe

2 cups raw milk


Pour the raw milk into a glass container that is easy to cover. It will need to be covered with plastic wrap and secured with a rubber band (or you can use a sealed glass container with a lid). Place the glass container in a warm area, like a cupboard, and check on it every 24 hours. This process normally takes three days.


After 36 hours, the raw milk should look something like this. The cream has separated and the whey is beginning to sink to the bottom, as seen by the vertical 'lines' in the milk. If you do not prefer a buttery taste in your cream cheese, using raw milk that has already had the cream separated is fine.


This shows the cream cheese beginning to form as the natural solids, or curds, begin to merge together.


You will know when the whey and cream cheese are ready when the liquid is clear and the curds are all floating on top.


To separate, place a large sieve lined with a tea towel (or two-to-three layers of cheesecloth) over a large glass bowl. Make sure the sieve does not touch the bottom of the bowl. Carefully pour the whey and curd into the sieve and allow it to rest for one hour. This will allow ample time for all the whey to drain from the curd. It should not be necessary to squeeze whey from the curd; if it remains wet after one hour, make sure the drained whey is not touching the sieve and leave it to rest for another hour. If properly drained, the whey will be slightly cloudy, but should not contain any pieces of curd.

Pour the whey into a sealable container and keep in the refrigerator for up to six months. The curds should have settled into a more solid form of cream cheese. Transfer to a sealable container and keep in the refrigerator for up to one month.

~Yields approximately 3/4 cup whey & 3/4 cup cream cheese.