Showing posts with label Raw Milk. Show all posts

Saturday, December 10, 2011

Virginia

Greetings from Virginia!

I have sincerely missed sharing recipes with you all. My move has left me in a much longer state of limbo than anticipated, as my kitchen is still sitting in boxes and will be through the Spring. I'll try and keep my update as food oriented as possible though.

As soon as summer hit, I jumped on the road and moved just south of Washington, D.C. on the Virginia side for a new job. Florida had its good moments, but I've been looking to move north for a long time now. Even though I've been here for months now, I still catch myself smiling spontaneously at the realization I'm finally someplace new. I was able to experience my first real autumn, and I'm looking forward to seeing snow this winter.

I'd have to say the most difficult part of the move was finding food to eat. The stores here are all different, and I used to shop at a co-op in Tallahassee which had everything I needed. Thus far, a grocery store named Wegman's has been holding me over pretty well. Their prices are about what I paid in Florida and their organic grocery selection is broad. My cooking is limited, but I've browsed through most everything and made a mental note of what to seek out from local, organic farms.

Which brings me to the fact I have not had raw milk or milk products since leaving Florida. I really miss my raw milk. I can tell I have less energy and my body is craving the calcium I used to supply it with regularly. In Virginia, it is illegal to sell raw milk. Instead, you have to buy into a cow share, which gives you the legal right to consume the milk since you own the cow. Local farms use the money from the cow share to feed and take care of the cow, and then distribute the milk to those people who are paying for its care. I've been using coconut milk for my coffee and eating coconut ice cream to hold me over, but it's not the same.

The closest cow share to me is in Richmond, which is over two hours south. Avery's Branch Farms provides not only raw milk through their cow shares, but eggs, pork, poultry, and several other delicious items. I've been speaking with Joy, who co-owns the farm with her husband Tim, and they are looking to expand further north. If you're in the area, but sure to send them an email to let them know you're interested!

I was able to make it into DC in early November for the annual Metro Cooking Show. The expo had several organic booths set up, thankfully, so I was able to snack and find some new favorite vendors.


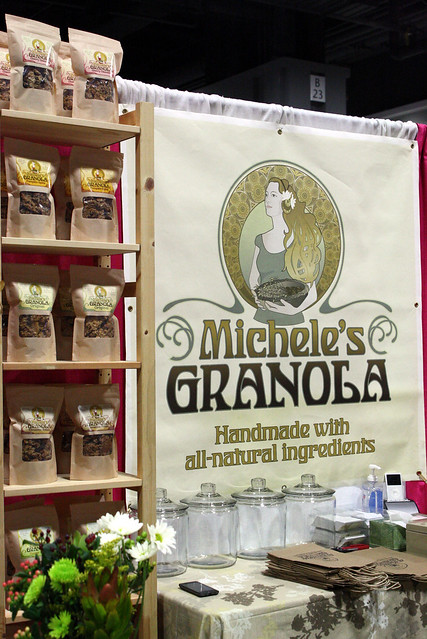
I like to snack on granola mixes since it's non-perishable and crunchy. I used to get in in bulk from my co-op, so I hadn't tried any up here yet. A company called Michele's Granola, based out of Maryland, was at the expo and I was able to sample all their flavors.

Tuesday, September 14, 2010

Raw Milk - How To Make Whey & Cream Cheese


In part three of my raw milk series, I'll show you how to make whey and cream cheese. As with the butter and buttermilk, no other ingredients are needed; we'll just need some cheesecloth or a tea towel and large sieve.

Whey is a food product which seems forgotten in our modern era, and is often sadly considered a 'waste' product left over from making cheeses. Whey is actually a nutritionally rich food that is important in lacto-fermented foods, like kimchi and sauerkraut, as well as needed for soaking grains. A few tablespoons of whey can also be mixed with filtered water to be consumed as a drink to sooth an upset stomach or digestive issue. Centuries ago, the Vikings from the Icelandic area consumed whey as a beverage and also used it to help preserve foods for longer periods of time, much like pickling foods in vinegar. The lactic acid in whey is what slows the growth of harmful bacteria, while the helpful bacteria and minerals contribute to its many uses in foods.

This process will produce a 'sour' whey, which I consider a co-product, not a byproduct, when making cheeses. Thus far in my experiences with whey, I have not used it plain in a drink, but it is helpful for soaking a variety of grains and legumes. The whey will keep for up to six months if kept in a sealed mason jar in the refrigerator. I usually make small batches in specific amounts for a certain dish though.

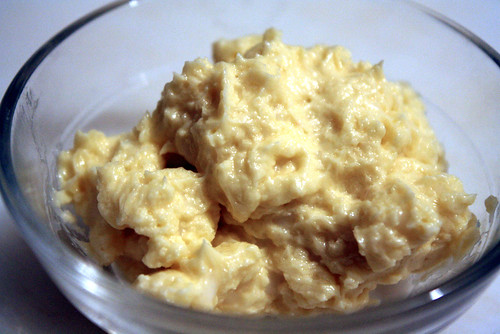
The cream cheese also rarely lasts long in my house! We both love cream cheese in recipes or plain on breads and fruits. If making some ahead of time to store, the cream cheese can be kept for up to a month sealed in the refrigerator. The homemade cream cheese is naturally sweet and has a unique rustic taste depending on the area the cows live and eat from; I can tell a slight difference in my cream cheeses when my local market runs out of my favorite dairy's raw milk and I use another. These little nuances help me feel connected to my local farms and makes me happy to be so close to the source of a natural food.

This process can be made with raw milk only. Using raw milk that is fresh will also take longer, so I recommend started this process after you've had some in your refrigerator for a few days. It is also faster in the summer, since the helpful bacteria react swifter in warmer weather. I place my raw milk on a shelf in my laundry room since it's always the warmest room in the house (mainly from it being the only room that receives natural sunlight from the rest of the house being shaded by old Florida oak trees).

How To Make Whey & Cream Cheese
Printable Recipe

2 cups raw milk


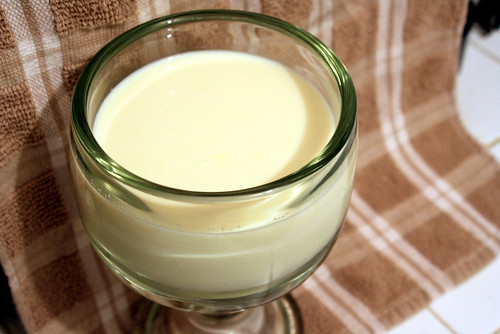
Pour the raw milk into a glass container that is easy to cover. It will need to be covered with plastic wrap and secured with a rubber band (or you can use a sealed glass container with a lid). Place the glass container in a warm area, like a cupboard, and check on it every 24 hours. This process normally takes three days.


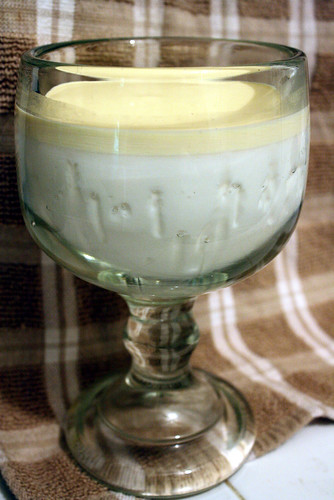
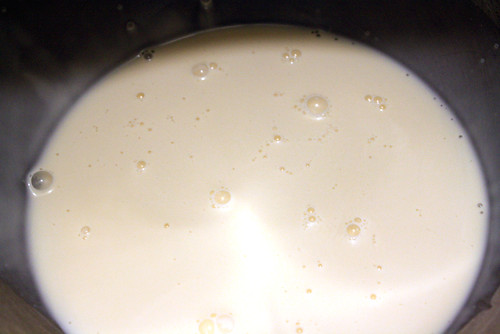
After 36 hours, the raw milk should look something like this. The cream has separated and the whey is beginning to sink to the bottom, as seen by the vertical 'lines' in the milk. If you do not prefer a buttery taste in your cream cheese, using raw milk that has already had the cream separated is fine.


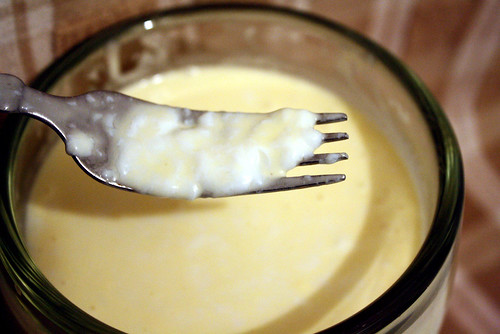
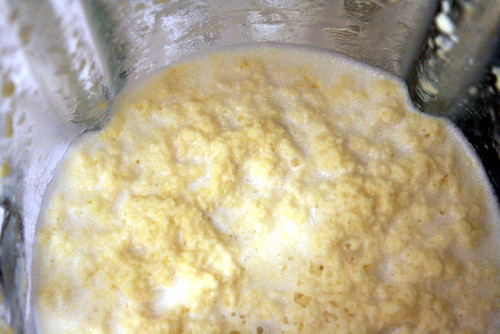
This shows the cream cheese beginning to form as the natural solids, or curds, begin to merge together.


You will know when the whey and cream cheese are ready when the liquid is clear and the curds are all floating on top.


To separate, place a large sieve lined with a tea towel (or two-to-three layers of cheesecloth) over a large glass bowl. Make sure the sieve does not touch the bottom of the bowl. Carefully pour the whey and curd into the sieve and allow it to rest for one hour. This will allow ample time for all the whey to drain from the curd. It should not be necessary to squeeze whey from the curd; if it remains wet after one hour, make sure the drained whey is not touching the sieve and leave it to rest for another hour. If properly drained, the whey will be slightly cloudy, but should not contain any pieces of curd.

Pour the whey into a sealable container and keep in the refrigerator for up to six months. The curds should have settled into a more solid form of cream cheese. Transfer to a sealable container and keep in the refrigerator for up to one month.

~Yields approximately 3/4 cup whey & 3/4 cup cream cheese.

Sunday, August 22, 2010

Sex & Candy Cake and Sweet, Sweet Violation Martini


Dante has taunted me for a second time.

This time it was in response to a Friday Recitation referencing the infamous song by Marcy Playground "Sex & Candy". Ah, that certainly brings back memories of high school. And, no, not *those* kinds of memories.

This was definitely a challenge. How in the world am I to capture the smell of sex and candy? More importantly, how can I do this in an appetizing manner to such a wide audience?

When people think of sex and candy, chocolate has to be involved somehow, so I knew that needed to be incorporated. And store bought candy is too cliché, so I made a note to make some myself that could be molded to whatever I ended up making. People are also normally aroused by the exotic, so sweet fruits were also listed. I started searching for recipes with these ingredients and soon found my answer: Passion Fruit & Mango Chocolate Cake. Awwhh, yeeeah.

Sex & Candy Cake
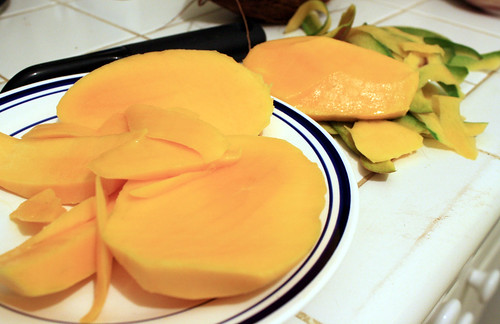
Mango slices give you a peek of what's inside.

But this wasn't good enough. It needed to be even sexier. Then I found a chocolate mirror glaze, so clear you can see yourself - ok, I won't go there.

Sex & Candy Cake
With the Passion Fruit Hard Candy.

I can tell you one thing - this cake got plenty of foreplay. It has a lot of steps and needs wooing before it's ready to assemble and enjoy. If you've been following along this past week, you'll have the instructions for making the ghee, cream, and butter. That's right baby, everything is made from scratch. You can't expect to get any love in return if you don't put in the effort.

Sex & Candy Cake
A slice of naked cake.

I decided to create the cake over several days, which was more exciting and less exhausting than trying to do everything at once. Sadly, my local markets are not carrying passion fruit, so I had to use juice. And I attempted to make organic hard candy this past Spring, but that didn't go too well, so hard candy is the first recipe you'll see on the blog using non-organic ingredients. I also took it off the burner a little too soon since I was so afraid of burning it, but the freezer is a great back-up for hardening the candy.

This was quite the experience and it certainly was sexy with all the different types of chocolate and exotic fruit aromas lingering in the air. And the taste. Oh, goodness, the taste. The cake is very light and soaks up the Mango Syrup beautifully. Plus your teeth sink through all the different layers as you begin to taste and feel all the layers melting together. And the hard candy was kept to the back of the cake so eating the cake first remained sexy and not messy, but it's a nice treat to suck on and allow all those layers of chocolate to linger in your mouth. And that martini is certain to make any situation both sweet and sexy. Between the chocolate, sweet fruits, vodka, and spiced rum - you'll have anyone smiling after these two delicacies.

Sex & Candy Cake
Oh, my. It's getting a little hot in here...the candy is melting.

All in all, this sexy cake and martini were easier than making Peppermint Fried Stork. I hope they exceed your expectations. They certainly satisfied mine. Now what to do with all this leftover chocolate ganache...

Sex & Candy Cake
Printable Recipe

Day 1

Passion Fruit & Mango Curd

3 egg yolks
1/2 cup turbinado
3 tbsp butter
1/3 cup passion fruit juice
1/4 cup mango purée

Passion Fruit & Mango Curd

In a small sauce pan, whisk together the yolks, turbinado, and butter.

Passion Fruit & Mango Puree

Add the passion fruit juice and cook over medium-low heat for several minutes. The water needs to evaporate until the curd begins to thickly coat the back of the mixing spoon.

Passion Fruit & Mango Puree

Next, pour the curd through a strainer.


Mango Puree

Then add the mango purée and mix together well.

Passion Fruit & Mango Puree

Cover with plastic wrap touching the curd and place in the refrigerator for at least three hours, although the curd will keep for several days.

Passion Fruit Hard Candy

2 cups white sugar
1 cup corn syrup
1/2 cup water
1/4 cup passion fruit juice

candy thermometer
mold

Passion Fruit Hard Candy

Prepare molds beforehand.

Passion Fruit Hard Candy

In a small sauce pan equipped with a candy thermometer over high heat, whisk together the sugar, corn syrup, and water. Once blended, allow the mixture to boil, but do not stir anymore. The mixture needs to reach 300*F. Once it has reached the hard crack stage, remove from the heat and add the passion fruit juice and blend evenly.

Passion Fruit Hard Candy

Quickly pour the mixture into a greased mold and allow to set until cool.

Day Two

Chocolate Génoise Cake

2/3 cup all-purpose flour
2/3 cup organic cocoa powder
6 large eggs
1 cup turbinado
4 1/2 tbsp ghee
1 1/2 tsp vanilla


Buttered Pan

Preheat the oven to 350*F. Butter a 9" cake pan and place a layer of parchment paper on the bottom and also butter.

Preparing Chocolate Genoise Cake

Sift the flour into a large bowl.

Preparing Chocolate Genoise Cake

Then sift the cocoa powder into the bowl.

Preparing Chocolate Genoise Cake

Then sift the flour and cocoa until the mixture is evenly blended.

Preparing Chocolate Genoise Cake

Next, in a medium sauce pan, whisk the eggs and turbinado together over medium-low heat. The mixture must be whisked the entire time to prevent the eggs from cooking. Remove from the stove once the mixture is warm to the touch, which should take 7-10 min. (Do not rush this step - plus your arms could use the workout.)

Chocolate Genoise Cake Batter

Then carefully sift and fold the dry ingredients into the mixture in thirds to prevent lumps from forming. Next whisk in the warm ghee and vanilla, still stirring constantly to prevent the eggs from cooking, until the batter is smooth and all ingredients are evenly incorporated.

Chocolate Genoise Cake Batter

Pour the batter into the cake pan and bake for 25 min. Remove from the oven and allow the cake to cool for 10 min.

Chocolate Genoise Cake

Transfer the cake to a cooling rack, remembering to remove the parchment paper, and allow it to cool completely. The cake can remain stored overnight on the counter if covered.

Chocolate Ganache

1 cup cream
1/2 tsp cinnamon
1/8 tsp nutmeg
1/8 tsp cloves
12 oz bittersweet chocolate

Preparing Chocolate Ganache

Place a small sauce pan over low heat half filled with water and allow it to steam.

Preparing Chocolate Ganache

Pour all ingredients into a medium metal bowl and melt over a steam bath for 17-20 min, stirring occasionally and allowing some of the water from the cream to steam off.

Chocolate Ganache

Remove the ganache from the stove and bring it to room temperature on the counter; then cover and place in the refrigerator until time to use. Remove it from the refrigerator at least one hour before needed so it is easier to manipulate.

Mango Syrup

1 vanilla bean
3/4 cup turbinado
2/3 cup mango purée

Organic Vanilla Bean

Slice the vanilla bean in half and gently scrap out the seeds.

Organic Vanilla Bean & Turbinado

In a small sauce pan, pour in the turbinado and add the vanilla seeds and bean. Stir in the mango purée until no dry turbinado remains.

Boiling Mango Syrup

Place over medium-high heat and allow the mixture to boil for 3-5min without stirring.

Mango Syrup

Remove from the heat and transfer to a glass bowl. Allow it to reach room temperature before placing in the refrigerator. Before using, allow the syrup to reach room temperature and remove the vanilla bean.

Day Three

Lacquer Chocolate Glaze

1/4 cup cold water
2 tsp agar agar
2/3 cup turbinado
1/3 cup water
1 1/4 tbsp honey
3/4 cup cocoa powder, sifted
1/3 cup cream

In a small bowl, mix cold water and agar agar together and set aside.

Making Lacquer Chocolate Glaze

In a small sauce pan over medium-high heat, melt together the turbinado and water. Once melted, mix in honey and then cocoa with a whisk until smooth.

Making Lacquer Chocolate Glaze

Return the pan to the stove set on medium-high heat and stir in the cream. Once boiling, remove from the stove and strain into a medium bowl. Allow it to cool for 12-15 min.

Lacquer Chocolate Glaze

Then mix in the gelatin mixture and allow the glaze to reach room temperature before using.

Assembly

Building The Cake

Using a long knife, carefully level the top of the cake in small patches. Use your hand the feel if the cake is level.

Building The Cake

Take the knife and make a shallow cut around the entire cake. Keep the tip of the knife on the outside of the cake and make deeper cuts. Rotate the cake in a circle until it both pieces are separated.

Building The Cake

Building The Cake

Brush the Mango Syrup onto the bottom layer of the cake.

Building The Cake

Take the Chocolate Ganache out of the refrigerator and spoon it into a plastic zip top bag with a corner cut off. Pipe the ganache around the rim of the cake about half an inch from the edge.

Building The Cake

Pour in the Passion Fruit & Mango Curd and level with a knife.

Building The Cake

Place on the top layer of the cake and tuck in some wax paper under the edges. Then pour on the Lacquer Chocolate Glaze.

Chocolate Genoise Cake with Glaze

Chocolate Genoise Cake with Glaze

The glaze will settle in a few minutes, then the wax paper can be removed to reveal clean edges for presentation. The cake will likely need to be put in the refrigerator or freezer for a few minutes at this point since the ganache will become soft and spread. This cake cannot sit out for long periods of time from all the different soft layers.

~Recipes adapted from Café Fernando: Passion Fruit, Mango and Chocolate Cake & L'Orange.


And like Dante mentioned, such a sexy cake cannot stand alone. This martini is sweet in more ways than one.

Sweet, Sweet Violation Martini
Printable Recipe

thin slice of mango
fine turbinado sugar
1 oz spiced rum
1 oz vodka
1 oz passion fruit juice
3 oz mango juice

Sweet, Sweet Violation Martini

Using a piece of mango, rub it along the rim of a martini glass and dip the glass into fine turbinado sugar. Add the rum through mango juice and lightly stir. Garnish with a strip of mango and enjoy.


~Original by Brie.
Friday, August 20, 2010

Raw Milk - How To Make Butter & Buttermilk


In part two of my raw milk series, we're making butter and buttermilk.

This is also just as simple as making cream. No extra ingredients are needed, but this time we'll need a blender.

This is great when just a little butter is needed or to keep warm on the counter in a butter bell for spreading on toast during lazy weekends.


If I get a batch of raw milk that turns out to be at least half cream, then I'll turn all the cream into butter and buttermilk. Usually, my raw milk source is between 25-40% cream, so I allot a certain amount to remain cream for what I need that week and will turn the rest into butter and buttermilk, and will buy sticks of organic butter to use in my recipes which call for more butter than I can make. Plus I'd have so much milk laying around! I really don't need any more incentive to eat tons of ice cream all the time.

Ooo, look at those flecks of butter.

It's best to use cream that is beginning to sour and turn into sour cream for butter. When you hesitate to put raw milk cream into your coffee, then it's time to make butter. It will be thicker and faster to turn into butter. Homemade cultured butter is even better with different nutritional benefits and a richer taste since it's almost like a cheese-and-butter fusion, as well as cultured buttermilk with its richer nutrients, but that's another post.

How To Make Butter & Buttermilk
Printable Recipe

1 cup raw milk cream


Place the raw milk cream into a blender and whip on high speed for several minutes until you notice the cream is no longer separating.


Stop the blender and pour out the buttermilk into a container for other use.

Add a few tablespoons of filtered, cold water and blend the butter for 20-30 seconds to cleanse it and make it a little firmer to work with. Pour out the water.


Using a spoon, remove the butter and place in a container to store in the refrigerator or in a butter bell on the counter for a few days.

~Yields 2-3 tbsp of butter.