
In part three of my raw milk series, I'll show you how to make whey and cream cheese. As with the butter and buttermilk, no other ingredients are needed; we'll just need some cheesecloth or a tea towel and large sieve.
Whey is a food product which seems forgotten in our modern era, and is often sadly considered a 'waste' product left over from making cheeses. Whey is actually a nutritionally rich food that is important in lacto-fermented foods, like kimchi and sauerkraut, as well as needed for soaking grains. A few tablespoons of whey can also be mixed with filtered water to be consumed as a drink to sooth an upset stomach or digestive issue. Centuries ago, the Vikings from the Icelandic area consumed whey as a beverage and also used it to help preserve foods for longer periods of time, much like pickling foods in vinegar. The lactic acid in whey is what slows the growth of harmful bacteria, while the helpful bacteria and minerals contribute to its many uses in foods.
This process will produce a 'sour' whey, which I consider a co-product, not a byproduct, when making cheeses. Thus far in my experiences with whey, I have not used it plain in a drink, but it is helpful for soaking a variety of grains and legumes. The whey will keep for up to six months if kept in a sealed mason jar in the refrigerator. I usually make small batches in specific amounts for a certain dish though.
The cream cheese also rarely lasts long in my house! We both love cream cheese in recipes or plain on breads and fruits. If making some ahead of time to store, the cream cheese can be kept for up to a month sealed in the refrigerator. The homemade cream cheese is naturally sweet and has a unique rustic taste depending on the area the cows live and eat from; I can tell a slight difference in my cream cheeses when my local market runs out of my favorite dairy's raw milk and I use another. These little nuances help me feel connected to my local farms and makes me happy to be so close to the source of a natural food.
This process can be made with raw milk only. Using raw milk that is fresh will also take longer, so I recommend started this process after you've had some in your refrigerator for a few days. It is also faster in the summer, since the helpful bacteria react swifter in warmer weather. I place my raw milk on a shelf in my laundry room since it's always the warmest room in the house (mainly from it being the only room that receives natural sunlight from the rest of the house being shaded by old Florida oak trees).
How To Make Whey & Cream Cheese
Printable Recipe
2 cups raw milk

Pour the raw milk into a glass container that is easy to cover. It will need to be covered with plastic wrap and secured with a rubber band (or you can use a sealed glass container with a lid). Place the glass container in a warm area, like a cupboard, and check on it every 24 hours. This process normally takes three days.

After 36 hours, the raw milk should look something like this. The cream has separated and the whey is beginning to sink to the bottom, as seen by the vertical 'lines' in the milk. If you do not prefer a buttery taste in your cream cheese, using raw milk that has already had the cream separated is fine.

This shows the cream cheese beginning to form as the natural solids, or curds, begin to merge together.
You will know when the whey and cream cheese are ready when the liquid is clear and the curds are all floating on top.

To separate, place a large sieve lined with a tea towel (or two-to-three layers of cheesecloth) over a large glass bowl. Make sure the sieve does not touch the bottom of the bowl. Carefully pour the whey and curd into the sieve and allow it to rest for one hour. This will allow ample time for all the whey to drain from the curd. It should not be necessary to squeeze whey from the curd; if it remains wet after one hour, make sure the drained whey is not touching the sieve and leave it to rest for another hour. If properly drained, the whey will be slightly cloudy, but should not contain any pieces of curd.
Pour the whey into a sealable container and keep in the refrigerator for up to six months. The curds should have settled into a more solid form of cream cheese. Transfer to a sealable container and keep in the refrigerator for up to one month.
~Yields approximately 3/4 cup whey & 3/4 cup cream cheese.
This process will produce a 'sour' whey, which I consider a co-product, not a byproduct, when making cheeses. Thus far in my experiences with whey, I have not used it plain in a drink, but it is helpful for soaking a variety of grains and legumes. The whey will keep for up to six months if kept in a sealed mason jar in the refrigerator. I usually make small batches in specific amounts for a certain dish though.
The cream cheese also rarely lasts long in my house! We both love cream cheese in recipes or plain on breads and fruits. If making some ahead of time to store, the cream cheese can be kept for up to a month sealed in the refrigerator. The homemade cream cheese is naturally sweet and has a unique rustic taste depending on the area the cows live and eat from; I can tell a slight difference in my cream cheeses when my local market runs out of my favorite dairy's raw milk and I use another. These little nuances help me feel connected to my local farms and makes me happy to be so close to the source of a natural food.
This process can be made with raw milk only. Using raw milk that is fresh will also take longer, so I recommend started this process after you've had some in your refrigerator for a few days. It is also faster in the summer, since the helpful bacteria react swifter in warmer weather. I place my raw milk on a shelf in my laundry room since it's always the warmest room in the house (mainly from it being the only room that receives natural sunlight from the rest of the house being shaded by old Florida oak trees).
How To Make Whey & Cream Cheese
Printable Recipe
2 cups raw milk
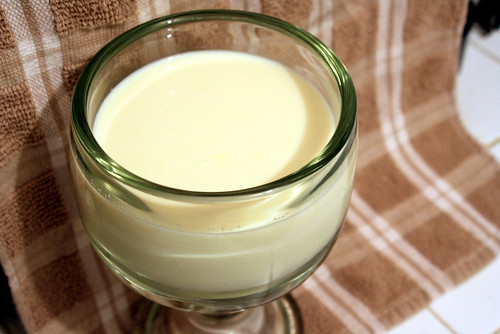
Pour the raw milk into a glass container that is easy to cover. It will need to be covered with plastic wrap and secured with a rubber band (or you can use a sealed glass container with a lid). Place the glass container in a warm area, like a cupboard, and check on it every 24 hours. This process normally takes three days.
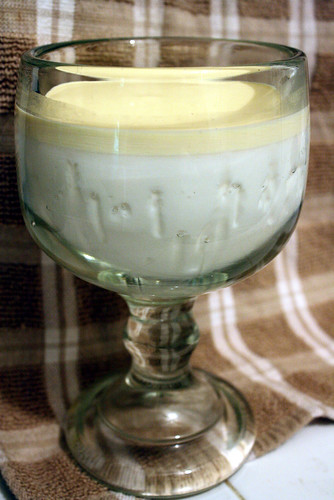
After 36 hours, the raw milk should look something like this. The cream has separated and the whey is beginning to sink to the bottom, as seen by the vertical 'lines' in the milk. If you do not prefer a buttery taste in your cream cheese, using raw milk that has already had the cream separated is fine.
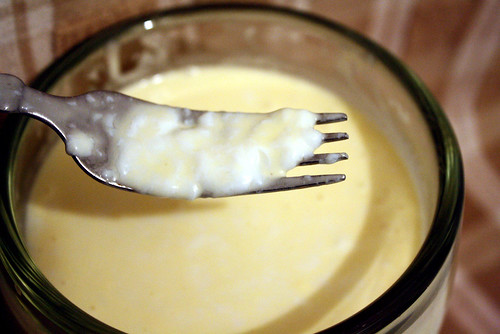
This shows the cream cheese beginning to form as the natural solids, or curds, begin to merge together.
You will know when the whey and cream cheese are ready when the liquid is clear and the curds are all floating on top.

To separate, place a large sieve lined with a tea towel (or two-to-three layers of cheesecloth) over a large glass bowl. Make sure the sieve does not touch the bottom of the bowl. Carefully pour the whey and curd into the sieve and allow it to rest for one hour. This will allow ample time for all the whey to drain from the curd. It should not be necessary to squeeze whey from the curd; if it remains wet after one hour, make sure the drained whey is not touching the sieve and leave it to rest for another hour. If properly drained, the whey will be slightly cloudy, but should not contain any pieces of curd.
Pour the whey into a sealable container and keep in the refrigerator for up to six months. The curds should have settled into a more solid form of cream cheese. Transfer to a sealable container and keep in the refrigerator for up to one month.
~Yields approximately 3/4 cup whey & 3/4 cup cream cheese.

